RSIC-1 Resilient Sound Isolation Clips provide 2 unique approaches to sound privacy that will prevent sound from noisy neighbors transmitting through your walls or floor/ceiling assemblies.
Experience with the RSIC-1 Clips has recorded remarkable improvements of up to an additional 20 STC points on walls.
The RSIC-1-R designed to retrofit and improve existing walls and ceilings has shown to improve existing walls by as much as 8-10 dB by actual field tests.
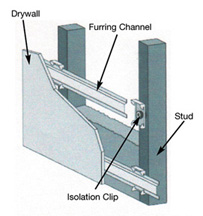
The RSIC-1 system builds the “room within a room” without having to use additional rows of studs and sheet rock, which take up valuable space. The clips are cost effective, durable and UL Classified in over 100 fire resistive design assemblies. The RSIC-1 is UL classified for use in one and two hour fire resistive design assemblies.
Walls: One and Two layers of 5/8″ Gypsum Board
Resilient Sound Isolation Clip (RSIC-1) shall be 48 inches maximum on center. (horizontal)
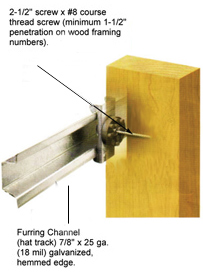
Fasten the Resilient Sound Isolation Clip (RSIC-1) to the the substrate with a fastener approved for a minimum pull-out and sheer of 120 lbs.
Ensure the internal metal ferrell is tight to the substrate.
Locate the first row of RSIC-1 clips within 3 inches from the floor and within 6 inches from the ceiling.
Snap in the drywall furring channel (hat track) into the RSIC-1 clips (horizontal for walls).
Place 1/4″ (minimum) shim on floor to fully support the gypsum board.
Install the gypsum board from the bottom up leaving a 1/4″ min. gap around perimeter.
ONLY remove the shims after ALL the gypsum board is completely screwed to ALL the drywall furring channels. Make sure every screw (floor to ceiling and wall to wall) is installed as required by the assembly design, in every layer of gypsum board before removing the shims at the floor. The shims are critical to ensure best results.
Caulk around the entire perimeter of the gypsum board. Use fire and smoke rated acoustical sealant where required.

 RSIC-1 Resilient Sound Isolation Clips provide 2 unique approaches to sound privacy that will prevent sound from noisy neighbors transmitting through your walls or floor/ceiling assemblies.